- Click Start, click Run, type
regedit, and then click OK. In Windows Vista/7, simply typeregeditin Start Search and hit Enter. - Navigate to the following registry key:
HKEY_LOCAL_MACHINE\SOFTWARE\Microsoft\Windows NT\CurrentVersion\Winlogon - Double-click the
DefaultUserNameentry, type the user name to log on with, and then click OK.IfDefaultUserNameregistry value name is not found, create a new String Value (REG_SZ)with value name asDefaultUserName. - Double-click the
DefaultPasswordentry, type the password for the user account under the value data box, and then click OK.If there is noDefaultPasswordvalue, create a new String Value (REG_SZ) withDefaultPasswordas the value name.Note that if noDefaultPasswordstring is specified, Windows automatically changes the value of theAutoAdminLogonregistry key from 1 (true) to 0 (false) to turn off theAutoAdminLogonfeature. - In Windows Vista/7,
DefaultDomainNamehas to be specified as well, else Windows will prompt for invalid user name with the user name displayed as.\username. To do so, double click onDefaultDomainName, and specify the domain name of the user account. If it’s local user, specify local host name.If theDefaultDomainNamedoes not exist, create a new String Value (REG_SZ) registry key with value name asDefaultDomainName. - Double-click the
AutoAdminLogonentry, type1in the Value Data box, and then click OK.If there is noAutoAdminLogonentry, create a new String Value (REG_SZ) withAutoAdminLogonas the value name. - If it exists, delete the
AutoLogonCountkey. - Also if it exists, delete the
AutoLogonCheckedkey. - Quit Registry Editor.
- Click Start, click Restart, and then click OK.
четверг, 26 февраля 2015 г.
windows 7 autologin

пятница, 20 февраля 2015 г.
четверг, 19 февраля 2015 г.
Zabbix authorization: switch to default, reset password
Switching authorization mode to default
update config set authentication_type=0;
Reset admin password
update zabbix.users set passwd=md5('mynewpassword') where alias='Admin';
вторник, 20 января 2015 г.
Отключение проверки цифровой подписи драйвера
Откройте редактор локальной групповой политики, набрав gpedit.msc
В меню политик перейдите в раздел User Configuration->Administrative Templates-> System->Driver Installation.
В правой панели найдите пункт ‘Code Signing for Device Drivers’ и дважды щелкните по нему.
В появившемся окне выберите ‘Enabled’, а в нижнем меню – ‘Ignore’. Нажмите Ок и перезагрузите компьютер. После перезагрузи и применения политика, в своей Windows 7 вы полностью отключите подписывание драйверов, и сможете установить любые, в том числе, неподписанные драйвера.
В меню политик перейдите в раздел User Configuration->Administrative Templates-> System->Driver Installation.
В правой панели найдите пункт ‘Code Signing for Device Drivers’ и дважды щелкните по нему.
В появившемся окне выберите ‘Enabled’, а в нижнем меню – ‘Ignore’. Нажмите Ок и перезагрузите компьютер. После перезагрузи и применения политика, в своей Windows 7 вы полностью отключите подписывание драйверов, и сможете установить любые, в том числе, неподписанные драйвера.
понедельник, 19 января 2015 г.
Windows: how to remap right ALT to left ALT
Windows Registry Editor Version 5.00
[HKEY_LOCAL_MACHINE\SYSTEM\CurrentControlSet\Control\Keyboard Layout]
"Scancode Map"=hex:00,00,00,00,00,00,00,00,02,00,00,00,38,00,38,e0,00,00,00,00
Switch layout by pressing Caps Lock: http://playground.teerapap.net/2008/03/switch-input-language-by-caps-lock.html
среда, 8 октября 2014 г.
CentOS 7 + Apache + Firewall
To make apache visible from network in CentOS 7 you must create some exceptions:
firewall-cmd --permanent --zone=public --add-service=http
firewall-cmd --permanent --zone=public --add-service=https
firewall-cmd --reload
firewall-cmd --permanent --zone=public --add-service=http
firewall-cmd --permanent --zone=public --add-service=https
firewall-cmd --reload
вторник, 7 октября 2014 г.
Gnome3 + Vino: VNC Viewer connection failed.
Temporary fix is: settings set org.gnome.Vino require-encryption false
From here: http://unix.stackexchange.com/questions/77885/how-can-i-connect-to-gnome-3-with-a-windows-vnc-client
From here: http://unix.stackexchange.com/questions/77885/how-can-i-connect-to-gnome-3-with-a-windows-vnc-client
четверг, 29 мая 2014 г.
CIsco 1131: VLans + MultiSSID
For a subject support you need to add to config next lines:
dot11 ssid guests
vlan 254
authentication open
authentication key-management wpa version 2
mbssid guests-mode dtim-period 75
wpa-psk ascii *************
interface Dot11Radio0
encryption vlan 254 mode ciphers aes-ccm
ssid guests
mbssid
interface Dot11Radio0.254
encapsulation dot1Q 254
bridge-group 254
interface FastEthernet0.254
encapsulation dot1Q 254
no ip route-cache
bridge-group 254
no bridge-group 254 source-learning
bridge-group 1 spanning-disabled
P.S.: If you're getting errors like "Sending station has left the BSS" try to use only wpa2 + aes or wpa + tkip.
dot11 ssid guests
vlan 254
authentication open
authentication key-management wpa version 2
mbssid guests-mode dtim-period 75
wpa-psk ascii *************
interface Dot11Radio0
encryption vlan 254 mode ciphers aes-ccm
ssid guests
mbssid
interface Dot11Radio0.254
encapsulation dot1Q 254
bridge-group 254
interface FastEthernet0.254
encapsulation dot1Q 254
no ip route-cache
bridge-group 254
no bridge-group 254 source-learning
bridge-group 1 spanning-disabled
P.S.: If you're getting errors like "Sending station has left the BSS" try to use only wpa2 + aes or wpa + tkip.
понедельник, 26 мая 2014 г.
openssh + Cisco
After update OpenSSH cannot connect to Cisco routers (1841, 3550). After some searching on the Web I found a similar bug #1026430 in on Red Hat Bugzilla.Solution was to add KexAlgorithms=diffie-hellman-group1-sha1 option to ssh command while connecting to routeres.
Another method is to create ~/.ssh/config with a couple of lines:
Another method is to create ~/.ssh/config with a couple of lines:
Host bigrouter
HostName 192.168.0.1
KexAlgorithms diffie-hellman-group1-sha1
понедельник, 19 мая 2014 г.
Linux-to-cisco: IPIP
Cisco global IP - xxx.xxx.xxx.xxx
Cisco ipinip IP - 10.1.252.5/30
Linux global IP - yyy.yyy.yyy.yyy
Linux ipinip IP - 10.1.252.6/30
/etc/ipsec-tools.conf:
Cisco ipinip IP - 10.1.252.5/30
Linux global IP - yyy.yyy.yyy.yyy
Linux ipinip IP - 10.1.252.6/30
IPIP
host
sudo ip tunnel add tun0 mode ipip remote xxx.xxx.xxx.xxx local yyy.yyy.yyy.yyy
sudo ip addr add 10.1.252.6/30 dev tun0
sudo ip link set up dev tun0
router
interface Tunnel173
ip address 10.1.252.5 255.255.255.252
tunnel source xxx.xxx.xxx.xxx
tunnel destination yyy.yyy.yyy.yyy
tunnel mode ipip
keepalive 15
exit
IPSec
host
/etc/racoon/racoon.conf:log debug;
path pre_shared_key "/etc/racoon/psk.txt";
listen {
adminsock "/var/run/racoon/racoon.sock" "root" "operator" 0660;
}
remote xxx.xxx.xxx.xxx {
exchange_mode main;
initial_contact on;
proposal_check obey;
proposal {
encryption_algorithm 3des;
hash_algorithm md5;
authentication_method pre_shared_key;
dh_group modp1024;
}
}
sainfo address yyy.yyy.yyy.yyy/32 4 address xxx.xxx.xxx.xxx/32 4 {
lifetime time 1800 seconds;
encryption_algorithm 3des;
authentication_algorithm hmac_md5;
compression_algorithm deflate;
pfs_group 2;
}
/etc/ipsec-tools.conf:
#!/usr/sbin/setkey -f
flush;
spdflush;
spdadd yyy.yyy.yyy.yyy/32 xxx.xxx.xxx.xxx/32 ipencap -P out ipsec
esp/transport/yyy.yyy.yyy.yyy-xxx.xxx.xxx.xxx/require;
spdadd xxx.xxx.xxx.xxx/32 yyy.yyy.yyy.yyy/32 ipencap -P in ipsec
esp/transport/xxx.xxx.xxx.xxx-yyy.yyy.yyy.yyy/require;
router
crypto isakmp key keymaster address yyy.yyy.yyy.yyy
crypto map VPN-CM 173 ipsec-isakmp
set peer yyy.yyy.yyy.yyy
set transform-set VPN
set pfs group2
match address IPSEC-173
exit
ip access-list extended IPSEC-173
permit ipinip host xxx.xxx.xxx.xxx host yyy.yyy.yyy.yyy
end
вторник, 11 марта 2014 г.
How to locate path to a file from an inode number
As for Ext4 filesystem next command should help you:
Answer source: http://unix.stackexchange.com/questions/35292/quickly-find-which-files-belongs-to-a-specific-inode-number#comment47948_35310
$ sudo debugfs -R 'ncheck 393094' /dev/sda2 2>/dev/null
Answer source: http://unix.stackexchange.com/questions/35292/quickly-find-which-files-belongs-to-a-specific-inode-number#comment47948_35310
четверг, 27 февраля 2014 г.
Touchpad support in Debian on Dell 7720
1. Download the latest driver source code package from here (currently newest package is 1.3): http://www.dahetral.com/public-download
2. Then run these commands:
2. Then run these commands:
sudo apt-get install dkms
tar -xf psmouse-alps-dst-X.X.tbz
sudo mv usr/src/psmouse-alps-dst-X.X/ /usr/src/psmouse-alps-dst-X.X/
sudo dkms add psmouse/alps-dst-X.X
sudo dkms autoinstall
sudo rmmod psmouse && sudo modprobe psmouse
Original post: http://forums.debian.net/viewtopic.php?f=16&t=95940#p477034
вторник, 18 февраля 2014 г.
CryptoPro: Перенос ключей
Для переноса ключей КриптоПро, хранящихся в реестре с одного ПК на другой можно воспользоваться стандартной функцией КриптоПро - копирование контейнеров на закладке Сервис приложения КриптоПро CSP
Можно скопировать контейнер на внешний носитель, например USB-флеш, а затем на новом ПК этой же процедурой с носителя скопировать в контейнер. Однако такой способ сработает, если при генерации ключа вы отмечали галочкой возможность экспорта ключа, по умолчанию возможность экспорта ключей (копирование) запрещено.
В этом случае необходимо проделать следующее:
- запустить REGEDIT.EXE и найти ключ реестра следующего вида:
- HKEY_LOCAL_MACHINE\SOFTWARE\Crypto Pro\Settings\USERS\<SID>\Keys\<KEYID>
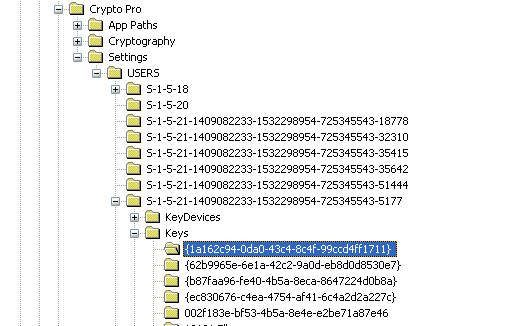
- где:
- <SID> – идентификатор пользователя, Windows XP/7 может быть определен с по следующему пути (с помощью файлового менеджера FAR или стандартным Windows Explorer с включенной возможностью просмотра скрытых файлов) "C:\Documents and Settings\Имя пользователя\Application Data\Microsoft\Credentials\, папка находящаяся по указанному пути и есть необходимый нам SID пример значения: «S-1-5-21-1636172540-271800513-1139810728-1095»;
- <KEYID> – идентификатор контейнера ключа, при входе на сайт высвечивающийся вверху диалогов выбора сертификата или в выпадающем списке напротив типа ключевого носителя; пример: «{026f52a7-e325-4e2a-9088-4be64a18f5dd}»; также можно определить, запустив КриптоПро CSP, далее в закладке Сервис нажать Просмотр сертификата в контейнере, в качестве носителя выбрать «Реестр», в списке напротив перебирать идентификаторы ключевых контейнеров, нажимая «ОК» и «Далее», пока не найдется нужный сертификат;
- после определения нужного ключа реестра – экспортировать его в файл (меню «Реестр», «Экспорт файла реестра…»),

- указанным выше способом определить идентификатор <SID> пользователя на машине, куда будут перенесены ключи
- в получившемся в результате экспорта файле заменить везде идентификатор старого пользователя на новый (при использовании доменной аутентификации <SID> пользователя не меняется и данный шаг можно пропустить),
открыть этот файл можно, например, в Блокноте (Notepad);
- импортировать файл реестра на новом ПК, куда переносятся ключи (просто запустив его двойным щелчком мыши);
- установить сертификат на новом ПК, используя программу КриптоПро CSP - закладка Сервис - Просмотр сертификата в контейнере
(при этом на новом ПК в КриптоПро должен быть, естественно, добавлен считыватель Реестр через закладку Оборудование кнопка Настроить считыватели)
Взято из руководства пользователя Райффайзен Банка.
суббота, 15 февраля 2014 г.
Windows 8.1 PPTP disconnection issue (Solved)
After upgrade my Windows 8 to 8.1 I've lost stability in connection to PPTP-Server on Cisco 1841. Windows client connects to the server, passes authentication, gets address and routes, and disconnects after 15-20 seconds. A solution is to turn on data encryption in VPN's settings.
среда, 12 февраля 2014 г.
Installing a root/CA Certificate
sudo cp foo.crt /usr/local/share/ca-certificates/foo.crt
sudo update-ca-certificates
среда, 22 января 2014 г.
DHCP Failover Configuration
Primary server:
Secondary server:
Source: https://kb.isc.org/article/AA-00502/31
failover peer "failover-partner" {
primary;
address dhcp-primary.example.com;
port 519;
peer address dhcp-secondary.example.com;
peer port 520;
max‐response‐delay 60;
max‐unacked‐updates 10;
mclt 3600;
split 128;
load balance max seconds 3;
}
Secondary server:
failover peer "failover-partner" {
secondary;
address dhcp-secondary.example.com;
port 520;
peer address dhcp-primary.example.com;
peer port 519;
max‐response‐delay 60;
max‐unacked‐updates 10;
load balance max seconds 3;
}
Both servers:
omapi-port 7911;
omapi-key omapi_key;
key omapi_key {
algorithm hmac-md5;
secret Ofakekeyfakekeyfakekey==;
}
subnet 10.100.100.0 netmask 255.255.255.0 {
option domain-name-servers 10.0.0.53;
option routers 10.100.100.1;
pool {
failover peer "failover-partner";
range 10.100.100.20 10.100.100.254;
}
}
Key generation:
dnssec‐keygen ‐a HMAC‐MD5 ‐b 512 ‐n USER DHCP_OMAPI
Source: https://kb.isc.org/article/AA-00502/31
четверг, 9 января 2014 г.
четверг, 12 декабря 2013 г.
Convert IMAP Folder names to readable text (UTF-7 to UTF-8)
echo "&BB0ENQQ2BDUEOwQwBEIENQQ7BEwEPQQwBE8- &BD8EPgRHBEIEMA-" | tr "&" "+" | iconv -f UTF7 -t UTF-8
понедельник, 2 декабря 2013 г.
How to block all incoming frames from particular mac-address on Cisco 2960 switches.
There is only one useful command I've found:
mac address-table static HHHH.HHHH.HHHH vlan 1 dropWas taken here.
четверг, 31 октября 2013 г.
How to install Java plugin in Chrome browser under Linux
Example:
mkdir /opt/google/chrome/plugins
cd /opt/google/chrome/plugins
Restart Chrome and enjoy!
Подписаться на:
Сообщения (Atom)